
Common menu bar links
Institutional Links
-
Translation Bureau
Language Portal of Canada
-
TERMIUM Plus®
-
Authors
- + Auverana, Iliana
- + Barber, Katherine
- + Blais, François
- + Boileau, Monique
- + Bucens, Vic
- + Cloutier, Yvan
- + Cole, Wayne
- + Collier, Linda P.
- + Collishaw, Barbara
- + Cormier, Chantal
- + Delisle, Jean
- + Doumbia, Bréhima
- + Ethier, Sheila
- + Fitzgerald, Heather
- + Gariépy, Julie L.
- + Gawn, Peter
- + Ghearáin, Helena Ní
- - Guyon, André
- Are you concerned about data security?
- Character Sets and Their Mysteries. . .
- Cloud computing
- Email: At once a blessing and a curse
- Forty Years of Development in the Blink of an Eye
- Globalization and the Forgotten Language Professionals
- How to improve your Internet conversations
- Introduction to macros for language professionals
- Is dictation outmoded?
- Machine translation in a nutshell
- My quest for information in 2010
- Open letter to young language professionals
- Realistic dreams of a language professional
- The ups and downs of online collaborative translation
- Translating tweets
- Translation memories and machine translation
- TRENDS
Free Public Domain Software - Trends
This Ordeal has Gone on Long Enough
(Free the data! Free the data! Free the data!) - Understanding search engines
- Voice recognition for language professionals
- Well-kept translation memory secrets
- What is a wiki?
- + Harries, Emma
- + Hug, Christine
- + Joe, Gregg
- + Jope, James
- + Lacroix, Kim
- + Laforge, Marc
- + Landry, Alain
- + Lapointe, Lucie
- + Lawrence, C.A.
- + Leighton, Heather
- + Lemieux, Claude
- + Leroux, Paul
- + Matsune, Heather
- + McClintock, Barbara
- + McNamer, Patrick
- + Mossop, Brian
- + Oslund, Richard
- + Ouimet, Nicole
- + Peck, Frances
- + Pontisso, Robert
- + Racicot, André
- + Roberts, David
- + Rodríguez, Nadia
- + Ross, Sheila M.
- + Roumer, Camilo
- + Samson, Emmanuelle
- + Sanders, Sheila
- + Schnell, Bettina
- + Senécal, André
- + Shatalov, Dmitry
- + Siemienska-Vachali, Maja
- + Sitarski, Mary
- + Skeete, Charles
- + Taravella, AnneMarie
- + Tautu, Doris
- + Urdininea, Frances
- + Vittecoq, Fanny
- + Wellington, Me Louise Maguire
Proactive Disclosure
Important notice
This version of Favourite Articles has been archived and won't be updated before it is permanently deleted.
Please consult the revamped version of Favourite Articles for the most up-to-date content, and don't forget to update your bookmarks!
Search and Functionalities Area
Introduction to macros for language professionals
I often hear colleagues talking about macros that they’ve created or found and would like to share with others. My article is not aimed at them, but rather at those who have never created a macro before. If you’re in the latter group, I’m going to show you just how easy creating macros can be.
Originally, “macro” meant “macro instruction,” that is, a sequence of actions triggered by a single command. Macro languages later became true, powerful programming languages. Now macros can do much more than initiate actions in the software they come from. For instance, a Word macro could find and delete a file created in Photoshop.
A word of caution before getting down to business: even though a macro might work well for you, nothing guarantees that it will work well elsewhere.
The word processing software that I’m currently using is Microsoft Word 2007. Unlike with previous versions, when you install MS Office 2007, the macros part is not automatically installed. Therefore, there’s a good chance that some of what I’m going to show you now does not match your current set-up.
In my software, the far right tab is called Developer. To create a macro, click on the Developer tab.

Macros in Word can be created at two levels. At the first level, the software simply saves the last operation. To repeat the operation, run the macro or use a keyboard shortcut.
For the purposes of this column, I’m going to create a macro for inverting two letters whose order I often have to switch. I frequently type computre instead of computer. I am therefore going to place the cursor just in front of the first inverted letter (i.e. the r in computre) and click on Record Macro.

The software suggests a default name: Macro1, Macro2, etc. If I create a lot of macros, that kind of name will not help me remember the difference between, say, Macro1 and Macro44, so I’m going to name my macro tbInvertCharacters.*
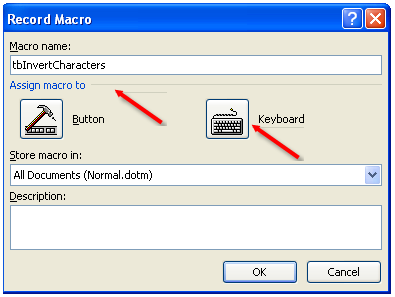
I also want to create a Keyboard shortcut for this macro. I have to be careful, however, because if I use a keyboard shortcut already associated with a Word function, the new macro will replace the existing one. For example, Ctrl+B, Ctrl+I and Ctrl+U are the shortcuts for bold, italics and underline respectively.
I therefore assign it a shortcut that I have never used: Ctrl+O (the Ctrl key and the O key pressed simultaneously).
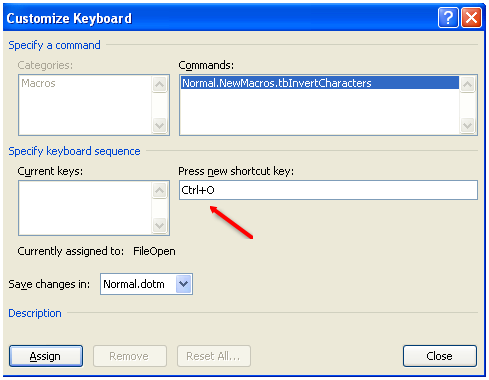
I enter the shortcut I have chosen and then click on Assign, at the bottom left.
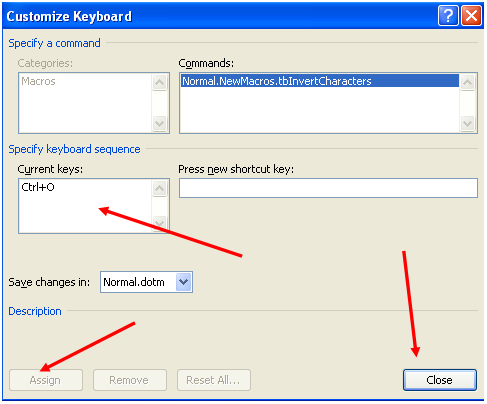
The Current keys box now contains my shortcut. All I need to do is click on Close to return to my text.
Next, I delete the r in front of the e, then insert an r after the e and click on Stop Recording.
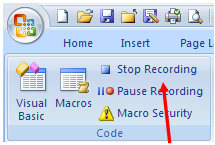
The macro has been created. I can now use my Ctrl+O shortcut to carry out this operation, but only with these two letters.
A general macro
If I want to make my macro general, I have to go up to the next level, which allows me to change an existing macro or even create a new one directly in the Visual Basic for Applications editor.
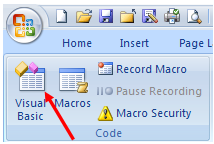
This macro, like all macros, becomes a subroutine.
Here is the code generated when I recorded my macro example above:
Sub tbInvertCharacters()
’
’ tbInvertCharacters Macro
’
’
Selection.Delete Unit:=wdCharacter, Count:=1
Selection.MoveRight Unit:=wdCharacter, Count:=1
Selection.TypeText Text:="r"
End Sub
In plain English: the macro deletes the first character to the right of the cursor, moves the cursor one character to the right and inserts an r to the right of the cursor. However, I would like to make the macro general so that I can invert any two letters. I’m therefore going to add a few lines in front of the one with the command to delete the first character.
Here is the coding for the new macro:
Sub tbInvertCharacters()
’
’ tbInvertCharacters Macro
’
’
Dim Character As String
Selection.MoveRight Unit:=wdCharacter, Count:=1, Extend:=wdExtend
Character = Selection.Text
Selection.Delete Unit:=wdCharacter, Count:=1
Selection.MoveRight Unit:=wdCharacter, Count:=1
Selection.TypeText Text:=Character
End Sub
What did I do? I added three lines. First of all, the Dim statement declares a variable that will contain the character. The following line selects the character to the right of the cursor, and the next line places the character in the variable. Then, in the second-last line, the command to always insert an r is replaced by a command to insert whatever the inverted character is (our variable Character).
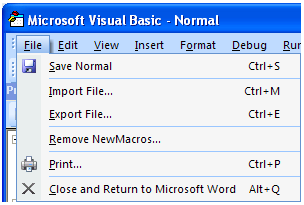
Once the macro has been completed, I can return to my text by selecting the option Close and Return to Microsoft Word from the File menu.
There you have it, a crash course on creating macros. I could have provided you with tons of additional information on the topic, but the purpose of this article is just to introduce you to the underlying technology of macros so that you try it out. If you have any trouble, you can always consult Word Help, but keep in mind that there are many sites that provide much clearer information than Word Help.
I often advise people to create a macro themselves and then look at the code. In the long run, you’ll get used to it, and then you’ll know whether you like it or not.
I hope spring brings you many interesting discoveries.
Remark
- * I don’t use accented characters, and since you can’t put spaces in the name, I capitalize the first letter of each word in order to be able to distinguish between the words.
© Public Services and Procurement Canada, 2024
TERMIUM Plus®, the Government of Canada's terminology and linguistic data bank
Writing tools – Favourite Articles
A product of the Translation Bureau


